A creative mess is better than tidy idleness. ~Author Unknown
Any day spent sewing, is a good day. ~Author Unknown
I love sewing and have plenty of material witnesses. ~Author Unknown
Showing posts with label tutorial. Show all posts

Monday, July 30, 2012

How to create an Ipod case using fabric scraps

Hello my name is Marisa, I am a new member of this beautiful place and today I want to share with you some of my creations, I love fabrics, and I like to use the larger pieces to the little ones pieces of fabric. When I created this project I was looking for something  where I could use those scraps of fabric, and then, I got the idea to create this crazy quilt iPod case:


         I made a tutorial showing how to create the crazy quilt for this case. The tutorial is here.

Then I did a tutorial that shows how to sew the case, here are some pictures that I
want to share with you.


For the next case I used a pair of old jeans, I love to recycle

You can see the complete tutorial here

Have a nice and I hope you enjoy the tutorials.
Marisa.

Thursday, July 26, 2012

Pencil Pouch Tutorial

My goal to embellish the back of the required pencil pouch failed.  You have to take it apart to much to be able to sew on the back.  So what's a mom to do with a mostly disassembled pouch?  How about finish the job and take some measurements. =)  Besides, if all else fails I bought two of the pouches (on sale) so my daughter could take the other one to school.

To make one you will need:

1/3 yard fabric
3 - 1/2" grommets
12" zipper
10" card stock
6"x 9" vinyl

Optional:
ribbons, patches, rhynstones, rick-rack, ect...  Basically whatever you would like to embellish it with.

Because I used quilting fabric I chose to double my fabric to make sure the pouch would be durable.  The Kindergarten teachers complained last year that the kids would drop the pencil boxes and the lids would break off; I didn't want them to find fault with my pouch saying it wasn't as strong as the required one.  Also, doubling the fabric made it so when looking through the window you are still looking at the right side of the fabric.  I'm going to show you what I did, but know you don't have to double the fabric. 
Pieces already zig-zag stitched together. Vinyl on top of Back piece (hence the white "glare").

Cut fabric:
  • Back 9 3/4" x 10 3/4" (x2)
  • 2 Side Panels 1 7/8" x 5 3/8" (x4)
  • Top Panel 1 3/8" x 10 3/4" (x2)
Cut vinyl window : 5 3/8" x 8 3/8"

Zipper: cut to 11" and either melt or use fray check on the ends to prevent fraying.  Zigzag stitch the zipper together to prevent the zipper from pulling apart before you can sew it on; this will later be removed.  To get a matching zipper I had to buy a 22" zipper and cut it down to 11".  The original zipper didn't have the stops so with mine being longer I cut them off. 
 Both ends are zig-zag stitched together.


Card Stock: 1 1/8" x 9 7/8"

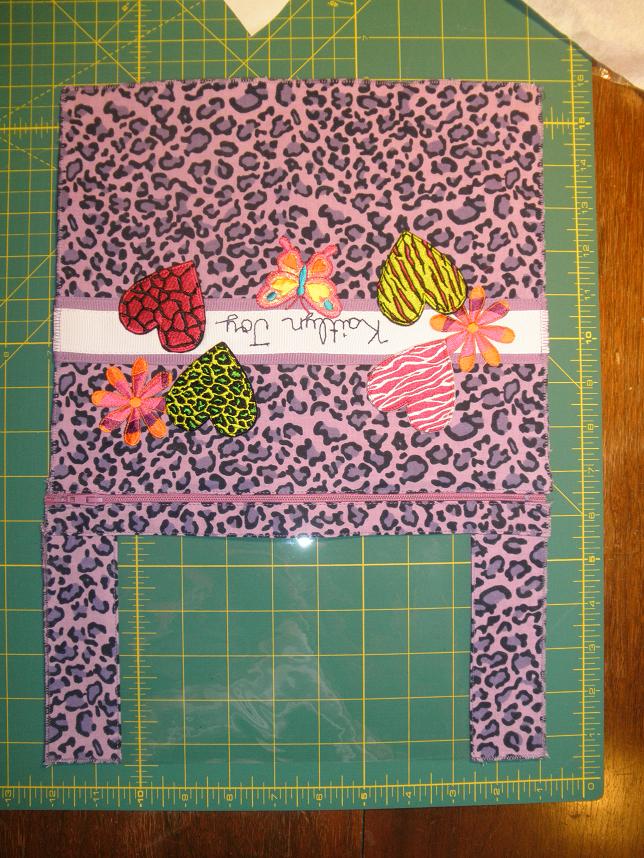
Have some fun on the back!  Remember the top will fold over perhaps 3/4" and the bottom a couple inches so 4" from the top is right at the center of the back.

Because I have tonsillitis I really didn't feel like being creative so a quick visit to Hancock Fabrics and Hobby Lobby gave my daughter plenty of patch options to chose from.  They were all iron on, which I did, but given that it's going on a pencil pouch I also sewed around each patch

If doubling, pair each piece up with wrong sides together and zig-zag or serge stitch all edges to both bind them together and prevent fraying.  If only using one layer you will still need to zig-zag or serge the edges.

Assembling... 

Iron one long edge of each side panel under 1/4" then lay it on top of the vinyl ends, overlapping 1/4" and top stitch.  If you're like me and using re-purposed vinyl you will face the same issue of the vinyl sticking to your machine.  I cut a straight line on a coffee filter, marked 1/4" (needed to see my seam allowance) and used a glue stick to get it to stay on my vinyl.  It worked amazingly well and after each seam I pulled the paper off and wiped the vinyl with a damp cloth to get the glue off.


Now that you have the two sides on it's time to add the top the same way as the sides; iron under 1/4", overlay it 1/4" onto the vinyl and top stitch.


Are you ready to tackle the zipper?  If you've never done one, it's really not hard.

Fold the Top piece over 1/4" and iron.  Slip the zipper under the Top piece until the fold almost touches the zipper (just like the one original) and pin like crazy. =)  Top stitch.  Now look at that you're halfway done with the zipper.  Good job!

The Back piece is sewn on just like the Top piece.  Fold the top edge under 1/4" and slip it up to the zipper just like the Top piece and top stitch.  Congratulations you just put in a zipper!

Fold the pouch inside out and line up the Back piece with the bottom of the Vinyl and Side Panels; sew 1/4".

Ready to sew up the sides?  Line up the Back panel with the back edge of the zipper just like in the photo; yes this means part of the back will wrap over the top of the pouch.  Once you have it lined up sew 1/4" seams down each side.  Make sure your zipper is open BEFORE you sew the sides together or you will have a lot of fun trying to get it open.


Clip the corners and turn right side out.

The bottom card stock is the original piece I took out of the pouch.
Slip the Card Stock into the bottom of the pouch and top stitch all the way around the Card Stock.
The animal print pouch is NOT by Elmer's; the card is only in there to show the size.

And there you go, you have a pencil pouch the same size as the required one.  The top corner looks wonky in the photo, but that's only because the zipper is making the fabric stand up.

I have yet to put the grommets on the pouch, but will just so the teacher won't say it's not the same as the required pouch.  On the store bought pouch the center of the grommets are 3/4" from each edge and 5".  I've never done it, but my husband said he's put them in before with a harmer and the little thing they come with.  I guess I'll see how easy they are. =)

Unless you have everything on hand or just want a cool pouch it's cheaper to buy the real deal.  The zipper cost me more than the whole pouch I purchased.  But... my daughter will have the coolest pouch in Kindergarten.

Tuesday, June 14, 2011

Card Wallet Tutorial

Happy Tuesday (or whatever day it is wherever you live)! I thought I would share a tutorial I whipped up on Apron Valley Road for my card wallet - I use mine for all my cards - debit/credit, store loyalty, driver's license, punch cards and a book of postage stamps (no wonder it's always bulging at the seams!). Here's the link to that post: Card Wallet Tutorial. It will also (I'm told) be on One Pretty Thing's Daily DYI sometime today.

And while you're on Apron Valley Road, take a PEEP at my post about our new chicken "coupe:" Hippie Chicks Chicken Coupe.  I think it goes nicely with the "Chicken Scratch" posts below, LOL! Have a great week!

Wednesday, May 25, 2011

CHICKEN SCRATCH

I (barb from bejeweled quilts) was so excited when I saw Val's post. I have a friend that has been wanting to teach me this Chicken Scratch for a while.

This is my semi completed project. This is going to be a pocket to an apron.

Mine does not look as good as Val's. I have to confess when I was a little girl, we were being taught hand stitching at church. Mine was horrible and to this day I have shied away from it. I have started a few projects and have been encouraged by some blogging friends. So...I will give myself and E for effort. Hopefully, the next time it will be better.

Val is right, this is so fun. She has a wonderful tutorial over at her bog.

Here are a few other names for Chicken Scratch
Snow Flake embroidery
Amish Embroidery
Depression Lace
Gingham Lace

Do check out her tutorial.....

Friday, February 11, 2011

Disappearing 4 Patch Block

Several of you already know how to make a disappearing 9 patch block, but there is now a disappearing 4 patch block. Run over to SewWonderful to find this fun and easy tutorial..

Sunday, October 10, 2010

Shoop-Shoop Bags - The Tutorial

Today, as promised, Aunt Pitty Pat and I are going to show you how to make Shoop-Shoop Bags. What are Shoop-Shoop Bags and how did they get their name? 
Well, many, many years ago, I was making some wall-pockety things to hold Christmas cards. I made a LOT of them to give as gifts that year. The pattern called for a large strip of fashion fabric, backing fabric, and cotton batting, cut crosswise and then trimmed to an exact size. At the end of my wall-pocktey thing extravaganza, I found I had a REALLY BIG stack of leftover pieces, approximately 7 1/4" by 10 1/2" from those crosswise strips. What to do with them? I folded them in half...and thought about it...and thought some more. They were all Christmas fabrics, so that made their potential use a bit narrow as well. As it happened, I had purchased my first Christmas gift the day before and had the receipt sitting nearby. The wheels started turning (and smoke was coming off the top of my head!). Ah hah! I had a plan! 

I stacked the outer, backing, and batting fabrics right sides together and slipped in a couple pieces of folded heavy ribbon. I sewed around the edges, leaving an opening for turning. After clipping and turning, I applied some Velcro on each end, then folded the whole mess in half and sewed up the sides, which also closed the opening I had left for turning. I grabbed that receipt and stuck it inside! I tucked my new, cute little bag into my purse and thought "One gift down, and umpteen more to go...and if something doesn't work out and needs to be returned, I know EXACTLY where to find the receipt!"
Well, after I showed a coworker my clever plan, everyone wanted one. I cranked them out and gave them away. Christmas came and went, and I decided to make some non-holiday-themed wall-pockety things. The leftovers from those got made up into the little bags and were used to store my and my coworkers' cash, makeup, and other goodies. One coworker, upon receiving hers, sat there pulling on the ribbon tabs to open and close the bag several times. She said "The Velcro sounds like it's saying Shoop-Shoop!" After that, we all started calling them Shoop-Shoop Bags. Such a simple thing, and I've seen little bags that are similar, but none that have the "handles" which make them so easy to use. I love challenging projects, but sometimes you just want a project that is quick, easy, and useful that you can assembly-line produce, with no hand sewing. This fits the bill!

Here's what you need:
  • 7 1/4" x 10 1/2" pieces of outer fabric, lining, and cotton batting such as Warm & Natural or Warm & White (or a couple layers of cotton flannel)
  • 5" piece of 3/4" wide hook-and-loop tape, such as Velcro
  • 5" piece of 1" or wider grosgrain ribbon, or a 1" x 5" piece of Ultrasuede, cut in half to make two 1" x 2 1/2" pieces
  • Thread, sewing machine, pins and basic sewing supplies
I prefer the Ultrasuede for the tabs, but didn't bring any with me to Ta Town, so I'm showing the grosgrain ribbon for this tutorial. I'd advise not using other ribbon because it just won't hold up. The Ultrasuede is really ideal, but not nearly as widely available as the grosgrain, which you can find almost anyplace ribbon is sold.

Here are the lining and batting pieces, cut and ready for sewing. I think the outer piece was hiding under the lining in this pic...
Find the center of each short end of either the outer or lining fabric and mark with a pin. Fold the ribbon pieces in half (remember, you cut them in half to make two 1" x 2 1/2" pieces) and pin them on the short ends, raw edges together - use two pins for each to keep them in place so they don't skew sideways. (Also, you may notice in the pic below that in this case, I've used a "one-way design" fabric, so I cut two pieces, 7 1/4" x 5 1/2" and seamed them to make a 7 1/4" x 10 1/2" piece with the design going in opposite directions.)
 Sandwich the batting on the back, and the lining on top, right sides together, and pin everything together to hold in place.
Starting near a corner, on a long side, sew all the way around with a 1/4" seam allowance, leaving a 2" opening.
Clip the corners - clip across the corner, then again at a steeper angle for best results:
Turn the bag out through the opening and use your favorite device to pull the corners out nicely. I love a Bamboo Point Turner and Creaser for this job.  You'll want nice, sharp corners on your bags. Here are a few I assembly-line sewed, ready for the next step:

On the inside, center the hook and the loop pieces of Velcro on each short end, close to the edge, and stitch all around, being careful not to catch/shred your thread when sewing the hook part.
Fold the bag in half, insides together. The Velcro will hold it closed and in place for sewing the sides. I always sew more than one at this point - it's much easier to butt one up against the previous one, since the bags are slightly thick - sewing from one to the next helps keep the presser foot level and moving smoothly. Backstitch on both ends to make the bag secure, since it will get a lot of stress when pulling it open. The opening you left will be closed automagically during this step - no handsewing!!!
It's that easy - you're done! You can add embellishments such as fabric flowers, fabric yo-yos, hot-fix crystals, etc. Now get thee to thy sewing machines and start making Shoop-Shoop Bags! Give them to your friends and say "Use this bag as THE ONE PLACE for all your receipts when buying your Christmas gifts! They'll all be in one place if you need to return something!" But don't forget to keep one for yourself! Then, make some more in non-Christmas fabrics to give and use for other stuff. Personally, I keep my cash - both bills and change - in one, and makeup in another. I recently had a friend pull one out of her purse to pay her lunch tab...I about gagged! It was so old and nasty looking! I told her "That's just soooooo WRONG! I shall make you a new one!" And the next time we had lunch, I had a pretty new one for her, but she wouldn't give up the old one - ugh...I wanted to burn it! So, give them a try and let me know how you like them :-) This really is my original design from about 20 years ago - as I said above, I've seen some similar, but not with both the Velcro and the tabs for easier opening. But I like to spread the joy, so feel free to make as many as you want :-)

Also, you may notice the very cool "fabric Ric-Rac" embellishment on some of the bags - here's the link to the tutorial for that - REALLY easy to do and it's just fabulous! I made some at the size recommended, then experimented with narrower versions. Zig-Zag Pillow

Wednesday, June 23, 2010

Leggings or Leg Warmer Tutorial

Summer has just begun, but for us who sew it's time to start preparing for the next school year. Perhaps you don't have a young daughter, granddaughter, niece or friends child in your life; maybe you know of someone who’s pregnant or has a new baby. Leg warmers are great for both genders when they’re learning to crawl; they're wonderful for protecting the knees. They’re also great for under dresses as the weather gets cooler. I know for those of us in the south “cooler” isn’t a word right now; can you say blazing heat? Do we really get used to breathing in the moist HOT air? What about frying eggs on the sidewalk? Sorry, rabbit trail! In the south we not only have HOT summers, but we can have mild winters too. So under all those cute handmade dresses my daughter will be wearing to K3 she will have on leggings. The great thing about leggings is she can wear them in the morning then take them off in the afternoon when it warms up.

Leggings are easy and cheap to make. All you need is tall women’s socks, some thread, and about 15 minutes (for the first pair). By the way, I used 1/4" seams and zig-zag stitched.

Pick your color and make sure they are tall socks. I bought these recently on clearance at Target for $1.
Cut the foot off the socks right above the heel. It's okay if it's already flaring where you cut; because it's knit it won't show.

Cut a section out of the foot portion 5"x 2.5" on fold. You will end up with a rough 5" square; these will be your cuffs. Note, I typically cut this from the bottom of the foot, but these socks really slanted so I went from the top.

Fold the cuffs so that the pattern of the leggings match the cuffs. I've messed this one up a few times so make sure it's how you like it.

The top cuff is still showing the direction I want it when it's on the legging. On the bottom cuff I opened it up leaving Top A up and folding the sides together. Zig-zag stitch down "sides" creating a tube.

Turn the cuff in half so that Top A & B are up and the wrong side of fabric is together. Sorry, the it's blurry!

Save your sanity and zig-zag stitch the two raw edges together. I've made the leggings without doing this and it's a pain; not to mention time consuming.
Also, (hehehe) the loop is so small make sure you don't catch the top in the portion you are sewing. I'm not saying I did it or anything (guilty look), but if one should catch even a little bit of the top you might just have to take the foot off the sewing machine to then clip the fabric.


Slip the cuff over the legging matching the seam up with one of the pressed sides of the legging. The cuff will be smaller then the legging so you must stretch it out to pin it down; you must also do this when zig-zag stitching them together.

Your finished!

Here she is at 1.5 years old wearing her leggings. As you can see she wasn't a very willing model; she was taking them off.


These are also great for travel! We were driving from England to Germany when at one gas stop we realized the temperature had dropped. We slipped the leggings on her and she was good to go. She was 1.5 years old in the photo wearing a pair of white leggings. She still wears both pairs of leggings at 3.5 years old. I've read they can wear them until they're about 7.