A creative mess is better than tidy idleness. ~Author Unknown
Any day spent sewing, is a good day. ~Author Unknown
I love sewing and have plenty of material witnesses. ~Author Unknown
Showing posts with label sewing. Show all posts

Sunday, February 17, 2013

Reprint from APP's

 Tote Handles
Carol asked how I make my Easy Peasy tote handles....
It's hard to explain without a photo.... I hope my Photo example helps.
First I decide what color I want my Main fabric. I cut this strip to 2 1/2" wide and desired length. (I cut these strips from centerfold to selvage on the material. I use my ruler and rotary cutter). Fold this strip in half and press wrong sides together with edges even to one side, and the ironed crease on the other side. Open the Main strip and fold and press the raw edges to the center as indicated in the photo.
This is the same way you would make a bias strip.
Cut a piece of batting 1" in width and the desired length. This batting strip is placed inside and down the center of the main fabric fold. Press all of this flat. Cut a 1 1/2" wide accent strip with desired length.
This accent strip is also made like a bias strip.
To construct.. Place the main fabric and batting with raw edges up. Next Pin the raw edges of the small bias to the cover the raw edges of the main fabric opening. As shown in the photo. Stitch down either side of the small bias to secure it and cover any openings.
I have found I love adding the accent trim to the handle.. but you can make them the old fashion way.
4 inch strips.. fold in half then fold in half and stitch down either side of strip to secure. If I do a handle this way I also add a bit of iron on interfacing to make them a bit stronger and not so wimpy.
I hope your not to confused with my instructions. Once you make one.. you will understand my concept.

Friday, February 15, 2013

My Shopping Bags and a Triple Zip Pouch

I want to share with you my latest creations


I uploaded a tutorial on my blog where I show how to make this  shopping
bags and a mini tutorial showing how to make the  tag.


 If you are interested in seeing my tutorial, this is the link


I was also busy trying to finish this triple zip pouch


I decided to participate in a triple zip along and finished my triple 
pouch just in time. In my post you will find links to all the tutorials to
sew this pouch, and a link to the online course in craftsy, it  was a
course I took and that has inspired me to create the main fabric for this
pouch.
 
from this
 
to this
 
 
To view this post, here is the link
 
 
I am happy to share with you my creations, I hope you enjoy them as well as I enjoyed to complete them.
Have a nice day.
 

Marisa :)


Monday, September 17, 2012

Let's sew a textile cuff using a pair of old jeans.

Hi I just did an update on my blog, this time I decided to recycle old scraps of
jeans and create a textile cuff.
I added scraps of fabrics and also some jewelry. I decided to take out of the closet my embellisher machine, and use it to blend the fabrics.


 If you have a minute, I invite you to visit my blog, hope you like my new tutorial. Here I show you some pictures of my textile cuff.


I hope you have a minute and you come to visit my blog to see the tutorial.
Have a nice day!
Marisa.

Monday, July 30, 2012

How to create an Ipod case using fabric scraps

Hello my name is Marisa, I am a new member of this beautiful place and today I want to share with you some of my creations, I love fabrics, and I like to use the larger pieces to the little ones pieces of fabric. When I created this project I was looking for something  where I could use those scraps of fabric, and then, I got the idea to create this crazy quilt iPod case:


         I made a tutorial showing how to create the crazy quilt for this case. The tutorial is here.

Then I did a tutorial that shows how to sew the case, here are some pictures that I
want to share with you.


For the next case I used a pair of old jeans, I love to recycle

You can see the complete tutorial here

Have a nice and I hope you enjoy the tutorials.
Marisa.

Thursday, July 26, 2012

Pencil Pouch Tutorial

My goal to embellish the back of the required pencil pouch failed.  You have to take it apart to much to be able to sew on the back.  So what's a mom to do with a mostly disassembled pouch?  How about finish the job and take some measurements. =)  Besides, if all else fails I bought two of the pouches (on sale) so my daughter could take the other one to school.

To make one you will need:

1/3 yard fabric
3 - 1/2" grommets
12" zipper
10" card stock
6"x 9" vinyl

Optional:
ribbons, patches, rhynstones, rick-rack, ect...  Basically whatever you would like to embellish it with.

Because I used quilting fabric I chose to double my fabric to make sure the pouch would be durable.  The Kindergarten teachers complained last year that the kids would drop the pencil boxes and the lids would break off; I didn't want them to find fault with my pouch saying it wasn't as strong as the required one.  Also, doubling the fabric made it so when looking through the window you are still looking at the right side of the fabric.  I'm going to show you what I did, but know you don't have to double the fabric. 
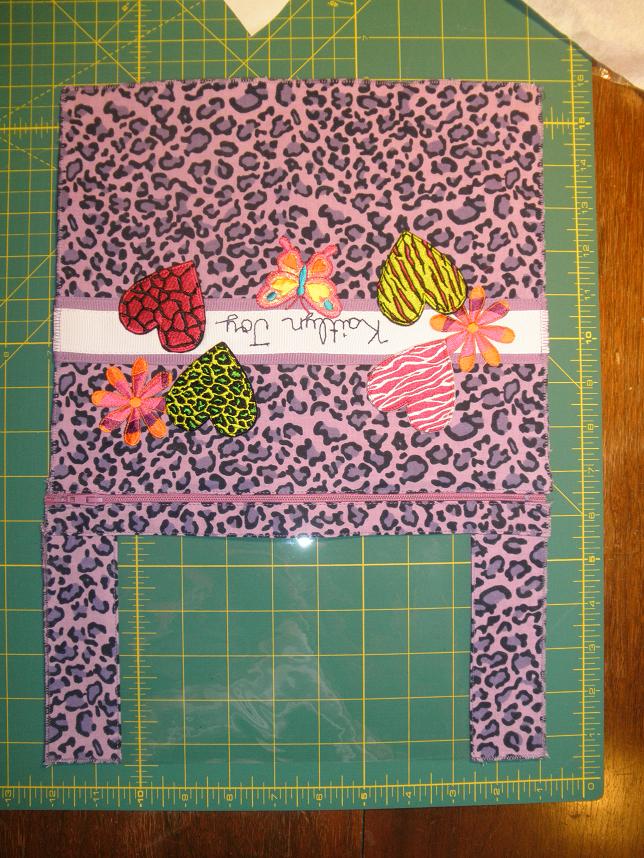
Pieces already zig-zag stitched together. Vinyl on top of Back piece (hence the white "glare").

Cut fabric:
  • Back 9 3/4" x 10 3/4" (x2)
  • 2 Side Panels 1 7/8" x 5 3/8" (x4)
  • Top Panel 1 3/8" x 10 3/4" (x2)
Cut vinyl window : 5 3/8" x 8 3/8"

Zipper: cut to 11" and either melt or use fray check on the ends to prevent fraying.  Zigzag stitch the zipper together to prevent the zipper from pulling apart before you can sew it on; this will later be removed.  To get a matching zipper I had to buy a 22" zipper and cut it down to 11".  The original zipper didn't have the stops so with mine being longer I cut them off. 
 Both ends are zig-zag stitched together.


Card Stock: 1 1/8" x 9 7/8"

Have some fun on the back!  Remember the top will fold over perhaps 3/4" and the bottom a couple inches so 4" from the top is right at the center of the back.

Because I have tonsillitis I really didn't feel like being creative so a quick visit to Hancock Fabrics and Hobby Lobby gave my daughter plenty of patch options to chose from.  They were all iron on, which I did, but given that it's going on a pencil pouch I also sewed around each patch

If doubling, pair each piece up with wrong sides together and zig-zag or serge stitch all edges to both bind them together and prevent fraying.  If only using one layer you will still need to zig-zag or serge the edges.

Assembling... 

Iron one long edge of each side panel under 1/4" then lay it on top of the vinyl ends, overlapping 1/4" and top stitch.  If you're like me and using re-purposed vinyl you will face the same issue of the vinyl sticking to your machine.  I cut a straight line on a coffee filter, marked 1/4" (needed to see my seam allowance) and used a glue stick to get it to stay on my vinyl.  It worked amazingly well and after each seam I pulled the paper off and wiped the vinyl with a damp cloth to get the glue off.


Now that you have the two sides on it's time to add the top the same way as the sides; iron under 1/4", overlay it 1/4" onto the vinyl and top stitch.


Are you ready to tackle the zipper?  If you've never done one, it's really not hard.

Fold the Top piece over 1/4" and iron.  Slip the zipper under the Top piece until the fold almost touches the zipper (just like the one original) and pin like crazy. =)  Top stitch.  Now look at that you're halfway done with the zipper.  Good job!

The Back piece is sewn on just like the Top piece.  Fold the top edge under 1/4" and slip it up to the zipper just like the Top piece and top stitch.  Congratulations you just put in a zipper!

Fold the pouch inside out and line up the Back piece with the bottom of the Vinyl and Side Panels; sew 1/4".

Ready to sew up the sides?  Line up the Back panel with the back edge of the zipper just like in the photo; yes this means part of the back will wrap over the top of the pouch.  Once you have it lined up sew 1/4" seams down each side.  Make sure your zipper is open BEFORE you sew the sides together or you will have a lot of fun trying to get it open.


Clip the corners and turn right side out.

The bottom card stock is the original piece I took out of the pouch.
Slip the Card Stock into the bottom of the pouch and top stitch all the way around the Card Stock.
The animal print pouch is NOT by Elmer's; the card is only in there to show the size.

And there you go, you have a pencil pouch the same size as the required one.  The top corner looks wonky in the photo, but that's only because the zipper is making the fabric stand up.

I have yet to put the grommets on the pouch, but will just so the teacher won't say it's not the same as the required pouch.  On the store bought pouch the center of the grommets are 3/4" from each edge and 5".  I've never done it, but my husband said he's put them in before with a harmer and the little thing they come with.  I guess I'll see how easy they are. =)

Unless you have everything on hand or just want a cool pouch it's cheaper to buy the real deal.  The zipper cost me more than the whole pouch I purchased.  But... my daughter will have the coolest pouch in Kindergarten.

Wednesday, May 23, 2012

Needlecase Workshop

Nomes's brag-a-long!: Needlecase Workshop: Today, Naomi and Polly went to the Lake Bonney Quilters group, and did a workshop using my Needle-Case tutorial. 

Well done to all the girls!

Friday, January 13, 2012

I am a bit late..

Hello everyone.. I am still running behind but I thought I would show you my Christmas Stocking that I made for my Annual Christmas Swap... I had a great time making this little guy. I used variegated, and silver threads on it. I have to admit.. I made a mistake on it.. I discovered the mistake when I edited the photos. I didn't even notice until it was already in the mail. Do you see the mistake??
OH well makes it all the more one of a kind :O) 
I hope my partner loved hers.. I was very excited when I received my exchange from her :O)
 I will modify this post soon to show all of you her lovely stocking!

I also made a fun craft apron for my daughter out of used jeans.... The center pocket has a zinger to attach your scissors and the pocket is to keep them tucked out of the way when not in use ;O)

Saturday, December 10, 2011

Sewin', Crochetin' and Gettin' Creative......Oh My!

Here's some of the things I've been making the last month.
I've been really busy trying to put things in my Etsy Shop to make money for Christmas.


 I crocheted this slouchy hat and a cowl neck scarf
out of a wool and acrylic blend yarn. 
I just kinda made up the pattern off of other hats that I've made.


 another slouchy hat of of a mixture of tweed yarns.


 and I crocheted this rug out of recycled bed sheets.
Can you guess which 2 characters are the main part of the rug?


 These snowmen looked really cute when I put them on a piece of jute
 and added some strips of torn fabric onto the jute. 
My picture of that didn't turn out to well though.


 I love this little dress ornament. 
 I've made dresses out of paper and used them as garland before,
 but I saw some larger fabric dresses on Etsy and loved them,
 so here's my version. 
I made several little dresses and accessorized each one a little different.
This dress I crocheted a collar and cuffs onto the dress and then added a crocheted hand muff.


and then I've been really busy making little felt ornaments and pins. 
 I wanted to get my brother a bottle of wine for Christmas so I made a reversible bag with a handle, then attached a piece of jute that I crocheted and added a felt ornament. 


Everyone is getting homemade gifts this year from us
so I better get busy and finish up some of my other projects.

Have a great weekend!

Sunday, October 2, 2011

Fall & Halloween 2011


I stared my creations for the fall . Here is little pumpkin prim folk from Threadare
Primitives.This is a sweet and easy pattern to follow ..........
My next doll is the cutest little witch but I can not seem to find who designed the pattern !!!!!

Wednesday, August 17, 2011

Repost from AuntPittyPats Blog


My niece started her first day of school at her new Magnet school. She was interviewed and selected to go to the Art Magnet School in our area this year. What is one of the staples for an ART School???? Of course an ART BAG. She had to have a new art bag to take... and guess who was asked to make one for her??? If you guessed The Pitty your wrong.. it was Auntie M :) 

Little Missy S loves the Beatles.. 
I incorporated some Yellow Submarine fabric in to her bag.... 
She loved loved loved it....
By the way Ms Nadine thank you for sharing the Beatles fabrics with me!!!
You made one little girl very happy!!

Look at this Happy Grin on her face!!! 
Missy S sent me a note via FB and told me she would carry it to school everyday! 
I am so happy she loved it!!
My sister was amazed.. she knows that I made it up as I sewed it together ;)
This was my second try at an art bag.. they keep getting better and better.. 
Maybe one day I will make one that is perfect!!

All art work photos are by my Niece Missy S...... Aren't they fun?
Please don't copy her art work..
THANK YOU!