A creative mess is better than tidy idleness. ~Author Unknown
Any day spent sewing, is a good day. ~Author Unknown
I love sewing and have plenty of material witnesses. ~Author Unknown

Monday, July 30, 2012

How to create an Ipod case using fabric scraps

Hello my name is Marisa, I am a new member of this beautiful place and today I want to share with you some of my creations, I love fabrics, and I like to use the larger pieces to the little ones pieces of fabric. When I created this project I was looking for something  where I could use those scraps of fabric, and then, I got the idea to create this crazy quilt iPod case:


         I made a tutorial showing how to create the crazy quilt for this case. The tutorial is here.

Then I did a tutorial that shows how to sew the case, here are some pictures that I
want to share with you.


For the next case I used a pair of old jeans, I love to recycle

You can see the complete tutorial here

Have a nice and I hope you enjoy the tutorials.
Marisa.

Thursday, July 26, 2012

Pencil Pouch Tutorial

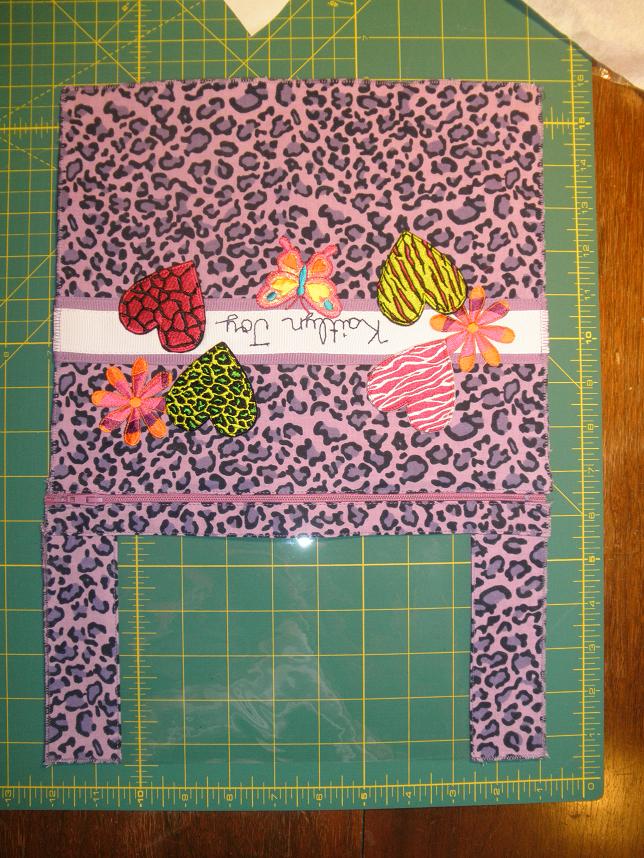
My goal to embellish the back of the required pencil pouch failed.  You have to take it apart to much to be able to sew on the back.  So what's a mom to do with a mostly disassembled pouch?  How about finish the job and take some measurements. =)  Besides, if all else fails I bought two of the pouches (on sale) so my daughter could take the other one to school.

To make one you will need:

1/3 yard fabric
3 - 1/2" grommets
12" zipper
10" card stock
6"x 9" vinyl

Optional:
ribbons, patches, rhynstones, rick-rack, ect...  Basically whatever you would like to embellish it with.

Because I used quilting fabric I chose to double my fabric to make sure the pouch would be durable.  The Kindergarten teachers complained last year that the kids would drop the pencil boxes and the lids would break off; I didn't want them to find fault with my pouch saying it wasn't as strong as the required one.  Also, doubling the fabric made it so when looking through the window you are still looking at the right side of the fabric.  I'm going to show you what I did, but know you don't have to double the fabric. 
Pieces already zig-zag stitched together. Vinyl on top of Back piece (hence the white "glare").

Cut fabric:
  • Back 9 3/4" x 10 3/4" (x2)
  • 2 Side Panels 1 7/8" x 5 3/8" (x4)
  • Top Panel 1 3/8" x 10 3/4" (x2)
Cut vinyl window : 5 3/8" x 8 3/8"

Zipper: cut to 11" and either melt or use fray check on the ends to prevent fraying.  Zigzag stitch the zipper together to prevent the zipper from pulling apart before you can sew it on; this will later be removed.  To get a matching zipper I had to buy a 22" zipper and cut it down to 11".  The original zipper didn't have the stops so with mine being longer I cut them off. 
 Both ends are zig-zag stitched together.


Card Stock: 1 1/8" x 9 7/8"

Have some fun on the back!  Remember the top will fold over perhaps 3/4" and the bottom a couple inches so 4" from the top is right at the center of the back.

Because I have tonsillitis I really didn't feel like being creative so a quick visit to Hancock Fabrics and Hobby Lobby gave my daughter plenty of patch options to chose from.  They were all iron on, which I did, but given that it's going on a pencil pouch I also sewed around each patch

If doubling, pair each piece up with wrong sides together and zig-zag or serge stitch all edges to both bind them together and prevent fraying.  If only using one layer you will still need to zig-zag or serge the edges.

Assembling... 

Iron one long edge of each side panel under 1/4" then lay it on top of the vinyl ends, overlapping 1/4" and top stitch.  If you're like me and using re-purposed vinyl you will face the same issue of the vinyl sticking to your machine.  I cut a straight line on a coffee filter, marked 1/4" (needed to see my seam allowance) and used a glue stick to get it to stay on my vinyl.  It worked amazingly well and after each seam I pulled the paper off and wiped the vinyl with a damp cloth to get the glue off.


Now that you have the two sides on it's time to add the top the same way as the sides; iron under 1/4", overlay it 1/4" onto the vinyl and top stitch.


Are you ready to tackle the zipper?  If you've never done one, it's really not hard.

Fold the Top piece over 1/4" and iron.  Slip the zipper under the Top piece until the fold almost touches the zipper (just like the one original) and pin like crazy. =)  Top stitch.  Now look at that you're halfway done with the zipper.  Good job!

The Back piece is sewn on just like the Top piece.  Fold the top edge under 1/4" and slip it up to the zipper just like the Top piece and top stitch.  Congratulations you just put in a zipper!

Fold the pouch inside out and line up the Back piece with the bottom of the Vinyl and Side Panels; sew 1/4".

Ready to sew up the sides?  Line up the Back panel with the back edge of the zipper just like in the photo; yes this means part of the back will wrap over the top of the pouch.  Once you have it lined up sew 1/4" seams down each side.  Make sure your zipper is open BEFORE you sew the sides together or you will have a lot of fun trying to get it open.


Clip the corners and turn right side out.

The bottom card stock is the original piece I took out of the pouch.
Slip the Card Stock into the bottom of the pouch and top stitch all the way around the Card Stock.
The animal print pouch is NOT by Elmer's; the card is only in there to show the size.

And there you go, you have a pencil pouch the same size as the required one.  The top corner looks wonky in the photo, but that's only because the zipper is making the fabric stand up.

I have yet to put the grommets on the pouch, but will just so the teacher won't say it's not the same as the required pouch.  On the store bought pouch the center of the grommets are 3/4" from each edge and 5".  I've never done it, but my husband said he's put them in before with a harmer and the little thing they come with.  I guess I'll see how easy they are. =)

Unless you have everything on hand or just want a cool pouch it's cheaper to buy the real deal.  The zipper cost me more than the whole pouch I purchased.  But... my daughter will have the coolest pouch in Kindergarten.

Friday, July 13, 2012

I need Snow!

It has been so hot here in Ta Town its time for snow!!! 
I just love the Holidays.. my two favorites are Halloween and Christmas. I have been working on my blocks for my Annual Halloween Block swap over the last few weeks. Which has really put me in the mood to do my Holiday stitching. 
If your interested in quilting and would like to join in on the fun go HERE to check out the details. There are still 3 or 4 openings. Yes international players are always welcome in my swaps.
I received the cutest quilt block from my daughter last year for Christmas. It was set aside waiting for me to decide what to do with it. After months and months of staring at it... I have decided. I am going to make a Christmas tote. This little tote will be so much fun to use while shopping.

I have decided after getting this far on the tote front that the little girl has been swallowed up by the fabrics. I have ordered some Fabric crayons to color in the design. Sort of an altered art project. I have never attempted this sewing/altered art form before. I hope I don't mess it up. I have seen some awesome projects using this crayon technique. I hope that the crayons add just a bit of pop to my little block. Have any of our readers used the fabric crayons before. I was also debating on using fabric inks. Let me know what you think please! Before I go and mess up my daughters lovely work.

** UP DATE**

I received my Fabric Caryons in the Mail this week.
Here is the mess that I made of things.
I was trying to blend and make flesh color.
As you can see it didn't work out so good.
Maybe next project will be better!!
It is cute though :O)

The Fabric Crayons really make a difference in the looks ;O)
Have fun and try something new!! I did :O)

Hello Blog Visitors :O)


Hello Everyone. I have noticed we are starting to get a lot of traffic and are having some awesome comments. If you are interested in being an author to our fast growing web site, you can simply comment leaving your email address and I will send you and invite to be a contributor. What is the benefit of being a contributor? You can post some of your lovely creations and tutorials here on this blog. As you can see we have had some awesome posts and tutorials from our members. 
We would love having you share your wonderful work with all of us. 
 
** If you are already an contributor and want to be removed for the list.. 
let me know and I will delete your name.**
Thanks ladies and have a Fantastic Day!

Tuesday, June 26, 2012

Mini Quilt

Do any of you use Swap-bot?  Four years ago I swapped on there, but when we started to prepare for another international move (ended up back in the US instead of Guam), I stopped using swap-bot.  Besides Aunt Pitty Pat started doing more challenging swaps with much better projects then I've done on swap-bot. =)  Recently I pulled the site back up and completed about five swaps. 

Of course I'm all about sewing so when the Mini Quilt swap came up I jumped on it.  The challenge was to sew a miniature quilt that was 8"x8" to 12"x12".  It had to be done in your partners favorite colors and the theme they chose.  It must be quilted and of course made like a real quilt with all three layers.  Here's what I sent...

My lady likes to hand quilt.  I was going to put a colorful quilt coming out of an antique sewing machine, but my goodness do you have any idea how tiny it would be to sew it in the small white area?  Once cutting out a template I gave up the idea.  Now... I did have to laugh when considering the size of the needle and the quilt it's sewing.

EDIT: Oops!  I was just counting the inches on the cutting board in the photo and noticed the quilt is actually 13" x 13"  Oh well...

Wednesday, June 6, 2012

Tooth Fairy Pillow

The tooth fairy will be visiting our house any day now so I had to quickly whip up a pillow to put the tooth in.  She actually had a pillow that I made when she was 2-3, but when a friend had a need and I didn't have the time to make another one, I gave it away.

 Here's the new one.  It's a lot different than the small square pillow with a big pocket and tooth on the front.  I have to be honest, I'm not a big fan now that it's done.  We tied a ribbon around her neck and it makes her look like she's about to fly a plane.  Oh well, it's different and it matches her room.
Kaitlyn Joy was happy with it.
The wiggling, wobbling proof.

Monday, June 4, 2012

Teacher Gift

School is out for the summer and my Kindergarten bound child asked last night when she's going back to school.  Hahaha...  Let's hope her love for school stays.

We made her teacher an apron for her end of the year gift.  Given that Kaitlyn Joy is older now and can contribute I gave her a piece of fabric, thread and a hoop.
 I had to re-thread her needle about a 1,000 times; it felt that way anyways. =)  She would tangle the string or go around the hoop.
 Although we talked about it a ton, she couldn't grasp the idea of small stitches.  I was okay if they were between small and medium, but she would make CRAZY big ones.  I pulled some out.  I bought a gel fabric pen (loved it!!!) and as you can see I put, "Kj May 2012".  Kj is how I always write her name on Facebook and in notes to her teacher.
 I used the triple stitch (whatever it's fancy name is, that's just what it did) to sew each of the kids hand prints onto the apron.  I know they aren't bold even though they're a different color, but I didn't want them sticking out any more than this.  After debating sewing each name onto the apron and knowing it would take to long (I finished last minute) I used the gel pen to write each child's name on their hand print.

And here it is finished!
Just in case she's having a non-teacher feeling day, I made it reversible.

Wednesday, May 23, 2012

Needlecase Workshop

Nomes's brag-a-long!: Needlecase Workshop: Today, Naomi and Polly went to the Lake Bonney Quilters group, and did a workshop using my Needle-Case tutorial. 

Well done to all the girls!

Sunday, May 20, 2012

Hawaiian Day Shirt

The preschool years have  QUICKLY come to a screeching end.  Sigh.  Where did the years go?  Friday was a hard day.  After two years of preschool (for 3 & 4 years olds) my daughter has officially graduated and will be heading off to Kindergarten in three months.  I didn't cry, but I thought about it.  On the last day of school the preschoolers have a private party; meaning no parents.  Last year they had Pajama Day and this year was Hawaiian Day.
I decided to cut up some of Kaitlyn's old long sleeve shirts, much to her displeasure, and sew a lei onto a tank.

Although she was upset the to small and stained shirts were cut into flowers, she loved the shirt.
Here she is right before going into the school.
Kindergarten here we come!

EDIT: I bought the grass skirt at Party City however if I would have checked them out sooner I would have made my own.  It's literally green raffia sewn with two straight stitches to a 1" elastic ban.  So if you want to make your own it would be easy.


Tuesday, May 15, 2012

"Color Book" for a 2-year old

Here's a fun project I just completed. It's for my little friend, Abby, for her 2nd birthday Thursday, to help her learn her colors. You can see the complete details and LOTS of pictures on my blog: Apron Valley Road.